 Kia Rio: Sunroof Adjustment
How To Initialize
| 1. |
Check that the glass has been installed.
|
| 2. |
Push the close switch. (Keep on pushing the switch)
|
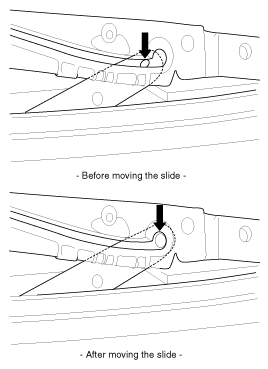
| 3. |
Release the sunroof CLOSE button with in 3 seconds. And then press
and hold the CLOSE button once again within 3 seconds until the sunroof
do as follows;
|
| 4. |
Then release the lever.
|
| 5. |
When the sunroof is closed completely, turn OFF the UP switch
initialize the motor completely.
|
When To Initialize The Motor
| 1. |
After initial vehicle assembly.
|
| 2. |
If the initial value is erased or damaged because of short power
electric discharge during operation.
|
| 3. |
After using the manual handle.
|
Operating The Sunroof Emergency Handle
| 1. |
Use the sunroof emergency handle to close or open the sunroof
manually if the sunroof cannot be closed electronically due to motor
or controller electrical malfunction.
|
| 2. |
Operating method.
|

 Sunroof Replacement
Glass Replacement
•
Put on glove to protect your hands.
...
 Mirror Replacement
Outside Rear View Mirror Replacement
•
When prying with a flat-tip screwdriver, wrap it wit ...
See also:
Console Components
1 . Floor console assembly
2 . Console upper cover [M/T]
3 . Console upper cover [A/T]
4. Potable ash tray
5 . Parking brake cover
6 . Floor console pad
...
Brake Switch Description
The present brake switch is used as an input variable for the ISG function
to detect bracke operation.
...
Specification
Item
Specification
Coil Resistance (Ω)
774 ~ 946 [20°C (68°F)]
...
Categories
- Kia Rio Manuals Home
- Kia Rio UB 2012-2017 Owners Manual
- Kia Rio UB 2012-2017 Service Manual
- Downloads
Copyright © www.kirmanual.com 2014-2025