 Kia Rio: Side Impact Sensor (SIS) Installation
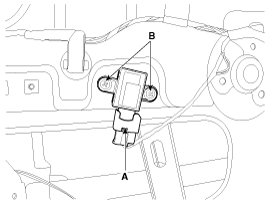
| Pressure Side Impact Sensor |
| 1. |
Install the new pressure side impact sensor with the screws (B)
then connect the pressure side impact sensor connector (A).
|

| 2. |
Install the front door trim.
(Refer to the Body group - "Front door")
|
| 3. |
Reconnect the battery negative cable.
|
| 4. |
After installing the pressure side impact sensor, confirm proper
system operation:
|
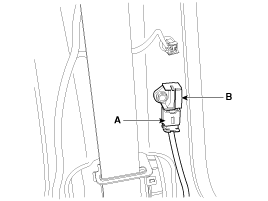
Side Impact Sensor
|
| 1. |
Install the new side impact sensor (B) with the bolt and then
connect the side impact sensor connector (A).
|
| 2. |
Install the center pillar trim.
(Refer to the Body group - "Interior tirm")
|
| 3. |
Install the door scuff trim.
(Refer to the Body group - "Interior tirm")
|
| 4. |
Reconnect the battery negative cable.
|
| 5. |
After installing the Side Impact Sensor, confirm proper system
operation:
|
 Side Impact Sensor (SIS) Removal
Pressure Side Impact Sensor
ãÂ
Removal of the airbag must be performed according ...
 Seat Belt Buckle Switch (BS) Description
The SRSCM shall monitor the status of the driver and front passenger seat
belt buckle. The SRSCM provides one pin each for the driver and front passenger
seat belt buckle status input. The se ...
See also:
Front Seat Replacement
ãÂ
When removing or installing the front passenger seat,
be sure to initialize the Weig ...
Hands free switch Installation
1.
Reassemble the hands free switch after connecting the connector.
2.
Reassemble the steering wheel.
3.
Reasse ...
Seats
...
Categories
- Kia Rio Manuals Home
- Kia Rio YB 2017-2025 Owners Manual
- Kia Rio YB 2017-2025 Service Manual
- Kia Rio UB 2012-2017 Owners Manual
- Kia Rio UB 2012-2017 Service Manual
- Downloads

Copyright ˋ www.kirmanual.com 2014-2025