 Kia Rio: Console Replacement
Floor Console Replacement
| [M/T] |
|

| 1. |
Using a screwdriver or remover, remove the gear boots (A).
|

| 2. |
Using a screwdriver or remover, remove the console upper cover
(A).
|

| 3. |
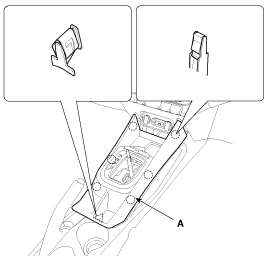
Using a screwdriver or remover, remove the parking brake cover
(A).
|

| 4. |
Remove the floor console pad (A).
|

| 5. |
After loosening the mounting bolts and clips, then remove the
floor console assembly (A).
|

| 6. |
Installation is the reverse of removal.
|

| [A/T] |
|
| 1. |
Using a screwdirver or remover, remove the gear boots (B) and
gear knob (A).
|

| 2. |
Using a screwdriver or remover, remove the console upper cover
(A).
|
| 3. |
Disconnect the connectors (A).
|

| 4. |
Using a screwdriver or remover, remove the parking brake cover
(A).
|
| 5. |
Remove the floor console pad (A).
|
| 6. |
After loosening the mounting bolts, screws, clips, then remove
the floor console assembly (A).
|

| 7. |
Installation is the reverse of removal.
|
 Console Components
1 . Floor console assembly
2 . Console upper cover [M/T]
3 . Console upper cover [A/T]
4. Potable ash tray
5 . Parking brake cover
6 . Floor console pad
...
 Crash Pad Components
(1)
1 . Main crash pad assembly
2 . Crash pad side cover [LH]
3 . Crash pad side cover [RH]
4 . Fuse box cover
5 . Crash pad lower panel
6 . Knee bolster panel
7 . St ...
See also:
Air bag
(1) Driver’s front air bag
(2) Passenger’s front air bag
(3) Side impact air bag
(4) Curtain air bag
Even in vehicles with air bags, you and your passengers must always wear the
safety belts p ...
Component Location
1. Driver power window switch
2. Door lock switch
3. BCM (Body Control Module)
4. Front door lock actuator
5. Rear door lock actuator
6. Internal junction box
...
Special Service Tools
Tool (Number and name)
Illustration
Use
09977-25100
Disc & hub assembly bolt remover
Removal and installation of disc & hub assembly ...
Categories
- Kia Rio Manuals Home
- Kia Rio UB 2012-2017 Owners Manual
- Kia Rio UB 2012-2017 Service Manual
- Downloads
Copyright © www.kirmanual.com 2014-2025